 This week at Gingersnap Creations it's the Once in a Blue Moon Challenge where the theme is thank you notes. A very appropriate topic not only with the recent Thanksgiving holiday, but also with Christmas upcoming it's always handy to have some thank you cards around. I've seen cards using text paper on a die cut shape and love the look. My little kraft paper notecard starts with a die-cut label shape that I've covered in strips of vintage paper and edged with a Krylon pen. I added a die-cut heart covered with several layers of Be Positive Glimmer Glam and Sunflower Sparkle Perfect Pearl Mist and finally stamped my sentiment with alphabet stamps (Studio G). So show us some cool thank you card ideas and enter the challenge on the GC blog post HERE. The challenge runs until Dec. 27th. Also be sure to check out the other cards from the DT on the blog - there are some terrific ideas!
Wednesday, November 30, 2011
GC Blue Moon Challenge
This week at Gingersnap Creations it's the Once in a Blue Moon Challenge where the theme is thank you notes. A very appropriate topic not only with the recent Thanksgiving holiday, but also with Christmas upcoming it's always handy to have some thank you cards around. I've seen cards using text paper on a die cut shape and love the look. My little kraft paper notecard starts with a die-cut label shape that I've covered in strips of vintage paper and edged with a Krylon pen. I added a die-cut heart covered with several layers of Be Positive Glimmer Glam and Sunflower Sparkle Perfect Pearl Mist and finally stamped my sentiment with alphabet stamps (Studio G). So show us some cool thank you card ideas and enter the challenge on the GC blog post HERE. The challenge runs until Dec. 27th. Also be sure to check out the other cards from the DT on the blog - there are some terrific ideas!
Monday, November 28, 2011
Rogue Redhead Designs Good Friends
 Here's a card I made using my favorite RRD text stamp from Relish Reading both as a bold element in the background and as a subtle tone-on-tone version as the background of the circles. I stamped the trio of women from Milliner Misses and punched them out with a 1 1/2" circle punch to create the circles. The card also includes a scrap of Glimmer Misted watercolor paper sprayed over a flourish screen that has been in my box of scraps for a long time because I just couldn't throw it away - I'm sure you all understand ;-) - and it was just the pop of color I needed to finish off the card.
Wednesday, November 23, 2011
November's My Mojo Monthly
 I spent a day being inspired by Sarah's prompt for her My Mojo Monthly for November - "Changing Faces" and this is my pile of projects! I had a lot of fun with this one :-) In Sarah's samples, she used 2 stamp sets and showed all the different looks you can get by exploring different styles and playing with different color combinations.
 All of my pieces have one thing in common - this text stamp from Relish Reading by Rogue Redhead Designs. I think a good text stamp is a necessary part of any stamp collection and I certainly have many, but I do find myself grabbing this one often.
 First up is a fun and funky art journal page with bright, primary colors of Glimmer Mist (Burnt Red, Sunflower, Jack Frost). I first stamped my text stamp in different directions onto tissue paper using StazOn, then crinkled it and sprayed it. After it was dry, I adhered it to a piece of cardstock and stamped a flourish (Stampers Anonymous) with gesso, adhered that panel into my journal, and had fun writing and doodling.
Here's a close-up of the tissue paper background:

 Next I tried my hand at a Clean and Simple one-layer card - totally not my style and I can't tell you how much I wanted to add more to it! ...but since this was about experimenting with the versatility of my text stamp, I stuck with it. I cut out a heart stencil using scrap copy paper and first stamped the text with sepia archival ink, then sprayed Glimmer Mist (Creme de Rouge and Burnt Red) and then removed my stencil. I added some sentiment stamps (Ali Edwards for Technique Tuesday) with Versamark and black EP.
Here's the close-up to see the subtle text within the heart:

 OK, now it was time to get grungy and distressed with a Tim Holtz style tag. I did a DIY version of kraft resist for my background by first stamping the flourish (Stampers Anonymous) onto a kraft tag with Versamark and then clear embossing it. I overstamped the text with StazOn and used a Q-tip with solvent cleaner to remove the ink from the embossed parts. Next I added distress stains in Fired Brick and Stormy Sky and distressed the edges and inked with Walnut Stain distress ink. I used the same stains on the seam binding ties, and had to add metal bits that I distressed with black paint.
Here's the close-up of this one:

 Next I created a gluebook collage page using my stamped text as a substitute for a vintage paper background. (Images: Green Paper and Graphic 45)
 And finally a vintage shabby chic collage using a subtle tone-on-tone version of the text stamp by stamping with Tea Dye DI onto paper rubbed with the same DI. I overstamped an image (Club Stamp), colored it with colored pencils and added found book text, vintage mother of pearl buttons and tatted lace, as well as machine stitching to layered papers torn, distressed and rolled.
Here's the close-up of this use of the text stamp and all the fun shabby details - don't you love the vintage tatted lace piece?

So much thought-provoking fun with this challenge!
Tuesday, November 22, 2011
Serena's Heart
 This month's Stampsmith Challenge is Ribbons and Lace and was set by Lynne Moncrieff. As I am always inspired by my friend, I had to do a Lynne-style piece! I used the Serena photostamp from the Stampsmith stamped onto glossy card and layered it onto a lace covered piece of canvas I cut into a heart shape. I colored bits of lace, seam binding ribbon and ribbon roses with Antique Linen distress stain and Rose Tea Glimmer Mist. I formed the ribbon into a swag on top and a frame around the picture and added pearls for accents.
Monday, November 21, 2011
Jane Austen Faux Book Collage
 In sorting through my piles - does anybody else "organize" this way?? - I found this faux book collage that I hadn't shown. It uses the Jane Austen set from Oxford Impressions along with some of my favorite 7Gypsies book covers. I placed a small niche near the bottom of the book and sandwiched a ribbon inside that trails to the outside like a bookmark.
Monday, November 14, 2011
Rogue Redhead Designs Rebel Challenge #5
 I've been having fun with the new Milliner Misses plate from Rogue Redhead Designs (which just happens to be on sale until Dec 30th!) and made this z-fold card following this month's Rebel Challenge of using only one designer paper with your stamp. My paper is from "On the Boardwalk" by Graphic 45. I cut a rectangle the size I wanted and then used a Martha Stewart border punch to create my panel. The punch actually has 3 rows of half-circles, but I cut off one to have it fit my card. The stamped girl is colored with watercolor pencils and her hat embellishment is a tiny butterfly I made dimensional by cutting it out from a second stamped hat and coloring it with Glaze pens to make it look jeweled.
Why not try your hand at this challenge and add your project to the post on the RRD blog HERE. The challenge will run until Dec.4th and a random winner will receive a $15 certificate to spend at the Rogue store.
Saturday, November 5, 2011
Vintage Gluebook swap
 Mary Green had a terrific idea for a swap involving creating gluebook pages. I created these collages using miscellaneous scraps and vintage backgrounds and sent them off to Mary.
Here is what I received back:
 She created a book out of the individual pages and used vintage book covers from her collection. Isn't that cool?
These are the individual pages that I received in the swap:
 Thanks to Mary Dawson, Kim Smith, Julie Loeschke, Joy Meadows, Kat Hou, and Linda Freeman - such fantastic collages!!!
Tuesday, November 1, 2011
Happy Anniversary Rogue Redhead Designs!!!
 Rogue Redhead Designs is celebrating its 1st Anniversary!!! There's a new website: http://www.rogueredheaddesigns.com/, new stamp releases, and of course - SALES!
Here's one of the new sets called Milliner Misses -
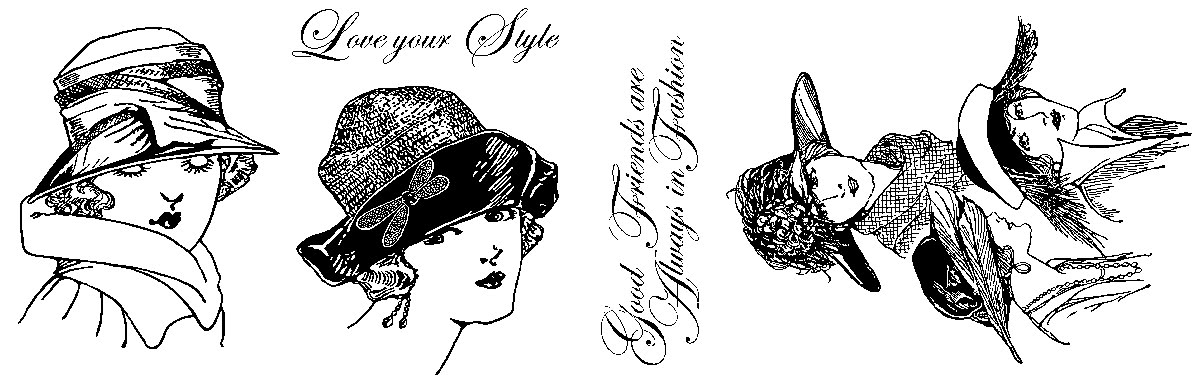
You might notice that one of the images is the fantastic logo of RRD. This mini plate packs a lot of style into just a few images. Capture the distinctive fashion and panache of twenties with these great elegant ladies and their fabulous hats. Perfect for gal pal cards and fashionable greetings of all kinds.
My card uses the trio of women on kraft cardstock that I highlighted with a cream colored pencil and some charcoal pencil shading around them. The cardstock has textures added from 2 different embossing folders, and on the top piece I rubbed metallic rub-ons onto the embossed areas.
I'm sure you'll agree that these new stamps are the bee's knees! The set's price is $7.50 but until December 30th it's only $6.00. Be sure to check out the RRD blog for some fantastic samples using the new plates.
I'm sure you'll agree that these new stamps are the bee's knees! The set's price is $7.50 but until December 30th it's only $6.00. Be sure to check out the RRD blog for some fantastic samples using the new plates.
Subscribe to:
Posts (Atom)
Blog Traffic
