Friday, July 29, 2011

Button Card ATC's

Here is a project I created using Sewing Notions stamps from Oxford Impressions. I made a box to hold a set of ATC's all based around the button card stamp in the set.

To make each ATC I started with a base covered with vintage French book text, added my stamped collage, then added buttons for a dimensional accent. I had a lot of fun combining the individual stamps into collages using layered masking. You have to think backwards though - start with your foreground image, then mask it with a post-it note cut to size and stamp your next image making that one look to be more in the background, and finally stamp the button card with all the other stamped images masked. You really can create a variety of collages with that simple technique. Here are the individual ATC's:


Wednesday, July 27, 2011

Gingersnap Creations Color Challenge

It's the final challenge for Steampunk month this week at Gingersnap Creations and it's a color challenge using leather, iron and brass. I decided to do a z-fold card that was a little less elaborate than my recent Steampunk experiments :-) The front panel of the card has a gold - or maybe I should say brass - embossed text stamp and layered over that is our dapper gentleman stamped in grey and cut-out along with more altered chipboard gears using the Krylon pen and Distress Stain technique. The inside grey panel of the back of the card has been embossed with a Tim Holtz folder and then the clocks are highlighted with brassy metallic rubons.

I hope you've joined in with the Steampunk fun this month, but if you haven't yet, try playing along with this challenge by posting your project on the GC blog HERE by August 21st. As an added incentive, this month's sponsor Dezinaworld has a prize you could win in a random drawing - see all the details on the GC blog.

Stamp Credits: Oxford Impressions

Monday, July 25, 2011

The Inventor's Notebook

I am so excited to share this project with you! When Gingersnap Creations decided to focus on Steampunk for the month of July, this idea was what came into my head to create and I can finally share it. I really enjoy playing with altered books, but do you ever feel guilty about cutting into a book and making it a work of art? I have come up with a way to make a faux version using 7Gypsies bookboard covers. If you've been a reader of my blog, you may remember my French notebook (HERE) that is done similarly. My favorite part of this project is that the entire book is a niche and when you open the door....

...you can see the inventor! I'm also sharing with you how to make this project - check out my tutorial on today's post at Gingersnap Creations HERE. If you make a version of my niche book, let me know because I'd love to see it!

Stamp Credits: Oxford Impressions

Thursday, July 21, 2011

Another set of scraplings

Here's another set of scraplings I made recently using the Regency Fashion set from Oxford Impressions. Actually, they are a teensy bit larger than scrapling size - hope I'm not breaking too many rules :-). I used a Hero Arts text stamp for my background, again stamping with tea dye DI and rubbing more tea dye DI over it with an ink blending tool for a tone-on-tone effect of subtle text in the background. I overstamped the women and colored them with colored pencils. As you can see, these are going to get great use as bookmarks, too!


Wednesday, July 20, 2011

Rogue Redhead Designs scraplings

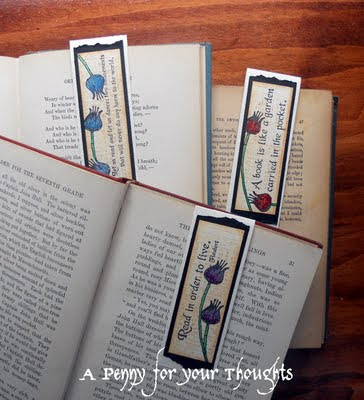
Scraplings are so much fun to make - their small size allows you to use up your scraps and I love using them in books as bookmarks. These are made with stamps from Floriculture and Relish Reading from Rogue Redhead Designs. The background piece is the text stamp from Relish Reading stamped with Tea Dye DI over a piece of cardstock colored with the same DI using an ink blending tool - love the subtle tone-on-tone effect. I added the cosmos bud from Floriculture and colored it with colored pencils, and completed each with a quote from Relish Reading.

Here they are individually:

If you haven't perused the Rogue Redhead Designs blog, make sure to check it out - we've had a bit of a scrapling thing going on!

Wednesday, July 13, 2011

Miss Steampunk!

Here she is...Miss Steampunk! So maybe it's not exactly like the Miss America pageant, but here's my piece for the Spicy Supply Challenge at Gingersnap Creations this week. Keeping with Steampunk month, the challenge involves using gears and cogs - such an integral part of the Steampunk style. This style is so fun and imaginative and I loved working on my dress form doll. I chose a vintage photo for her head (Enchanted Mercantile) and cut down a bird cage die cut for her skirt. Both metal and chipboard gears were added; the chipboard ones were given the Krylon pen, sandpaper, and Distress Stain treatment for an aged metal look; I thought a ticking clock would be a good fit over her heart, and tiny watch parts were added as hair accoutrements. The background is a gear stamp from Stampers Anonymous - always liked that one with its link to Cleveland - reminds me of living near there - and the Steampunk word is from Oxford Impressions.

Here's a closer look of her hair-do!

Hope you'll play around in the Steampunk style and add a project to the Gingersnap Creations blog post HERE. The challenge runs until August 7th - plenty of time for you to join in!

Tuesday, July 12, 2011

Sewing Notions Fabric Collage

I've been enjoying working with fabric recently and here's a collage done with the recent release called Sewing Notions from Oxford Impressions. My muslin was first aged with tea dye distress ink kind of using a wrinkle-free distress technique - placing the fabric into DI sprayed with water on a craft sheet - not exactly the same effect as with paper, but still a good, worn look. I stamped a collage of multiple images onto the muslin by masking and using coffee archival ink. The muslin panel is backed with batting and sewn onto a fabric panel. I also sewed two seam binding ribbons together for the hanger with a long basting stitch so I could pull the ends and slightly gather it. To finish it off, there are 2 buttons sewn on and after stamping and cutting out the floss cards, I wrapped a bit of embroidery floss to each one before attaching to the piece. This week at the Simon Says Stamp and Show challenge the theme is "stitching" - a perfect fit for my project!

Sunday, July 10, 2011

A special birthday present


Sometimes you want to make something really special and after combining things, and playing around with it for awhile, you finally make exactly what you wanted. Several months ago I took an online class from Nancy Maxwell James and one of my most favorite projects involved making a fabric collage with a base of cotton batting. I knew that I would make another version from this idea of Nancy's and it has turned out to be just what I had hoped. The center image is a TAP transfer of the Edwardian actress Miss Lily Elsie. I got out my scraps of lace and added rolled muslin roses and mother of pearl buttons and kept rearranging until it was right. I really like all the lacy textures to go along with her beautiful lace dress in the photo. So, my special birthday present? This should've ended up in my Mom's mailbox yesterday as today is her birthday - Happy Birthday, Mom!!

Saturday, July 9, 2011

Flourish Concertina

I made this concertina ATC book with three challenges in mind: Simon Says Stamp and Show...a flourish, Inspiration Emporium Challenge - embossing, and Grungy Monday with a Tim Holtz challenge technique. It's basically a long strip of watercolor paper folded to hold 4 ATC's. The cover shows embossing using an embossing folder that is also a flourish pattern and is highlighted with metallic rub-ons. Also on the cover is a chipboard flourish that I first inked with a Krylon pen, then sanded and added distress ink. I'm also still having fun with snippets from my 1927 Etude magazine and you'll notice music notes and markings throughout. The next picture is of the opened book:

Then here is a picture of all the ATC's when the entire concertina is opened. The background of each ATC follows a technique from the Tim Holtz blog from his March 2008 Technique Challenge. I used a script and flourish stamp from Red Lead to stamp with white paint, then sprayed over that with distress ink and perfect pearl sprays all using perfect gold pearls combined with a different DI (colors are Broken China, Bundled Sage, Faded Jeans, and Mustard Seed). I also overstamped a flourish (Stampendous) with archival ink on the top of each.

I used a combination of vintage images from Luna Girl, Art Creations Friday, Designer Digitals and Altered Pages to complete each ATC. Here are pictures of each of them for a closer look.


Friday, July 8, 2011

Green Paper July Challenge

I've been wanting to play with the Green Paper Collage Challenge and finally got a piece completed just in time - ok, it ends tonight so it really is just in the nick of time! In the challenge, Mary provides a group of three vintage images and your project must use at least a piece of all three. My project is a book cover collage. The featured image is the lovely Miss Helen Pitkin and the other pieces of the collage sheet are the tickets and the flowers. I elaborated on the flower theme by finding a piece of music called "Thour't like unto a flower" from Etude magazine from 1927. I used the piece's title, a scrap of the music sprayed with cranberry Adirondack Colorwash through a flower and flourish Prima stencil, and I even used a few of the words from the song: "I gaze on thee, so fair, so pure". I added some ribbons and lace to the bottom corner and accented the lace flowers with victorian velvet Distress Ink. My layered flowers were created simply by printing the sheet in 2 different sizes so I could stack the flowers for added dimension.