Thursday, May 31, 2012

Double Published!

These two magazines appeared in my mailbox on the same day and both contained my artwork!!!! Take Ten is on the left, and I have two cards using Rogue Redhead Designs stamps and on the right is the Summer issue of Somerset Studio Gallery that has an 8x10 canvas board collage submitted for a words of wisdom challenge.

I also have to mention several friends that are also in these issues.  In Take Ten the head Rogue herself, Sharon Briss has multiple cards with RRD stamps and even a terrific double page spread showing cards with a cool bleaching technique.  Also represented is Deb Corder,  a fellow Rogue and Ginger, and the beautiful work of Lynne Moncrieff.  In Gallery you'll find fun Halloween pieces by Lynn Stevens, and more from Lynne Moncrieff.  It's always an honor to have your work published, but made even sweeter by sharing the honor with friends.

Wednesday, May 30, 2012

Pushing a journal to the Second Floor

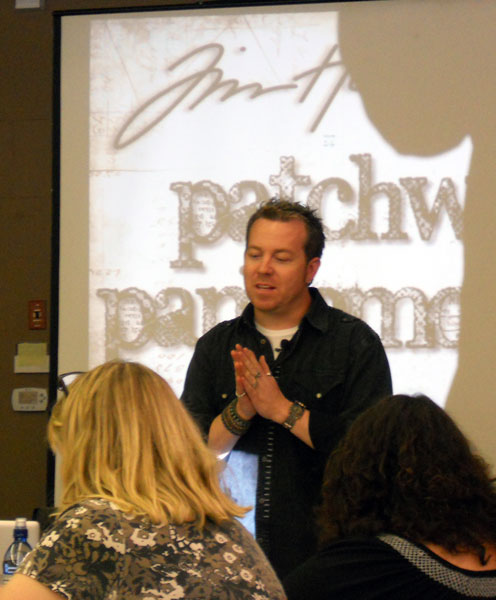
I've been working through an online workshop by Roben-Marie Smith called Collage, Construct and Affirm where you make a cool portfolio journal using a base of a sheet from a large canvas pad. As I've been exploring more mixed media art and learning to stretch from what I often do - worn, soft, comfortable colors and vintage images - I'm trying to expand my horizons and try new things to continue to grow. I also have been reading the blogs of Julie Fei-Fan Balzer and Nathalie Kalbach and learned about their Second Floor Challenge which is designed to push you to experiment and determine what could happen if you try. So in the spirit of the Second Floor Challenge, I'm taking it to the next level! The current challenge theme is "circles" (See Julie's blog post HERE to join the challenge) and here's how I've incorporated them:


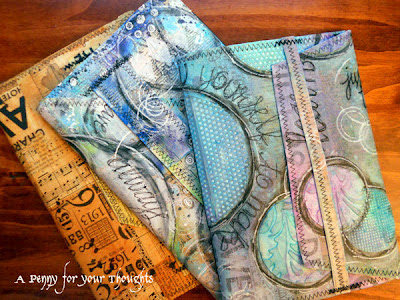
So much of what I find appealing about mixed media art is the depth of the layers. My 16 x 20 canvas sheet is first covered with a collage of tissue papers and washi tapes.


Next, I added circles with texture that I created either by applying two different types of drywall tape to a sheet of canvas before cutting out the circles, or by applying flexible modeling paste through a Crafter's Workshop stencil onto the canvas and then cutting out the circles.  I've admired the look of texture created with drywall tape, but hadn't tried it, and I've also not used much modeling paste, so it was fun to try that.  I also added color at this point and wanted to see what would happen by watering down gesso with Glimmer Mist - great color, but alas, no glimmer :-(.  Also the drywall tape with the circle holes started to lift-up when wet with paint and in places I had to use extra adhesive, but the square type didn't seem to lose it's stickiness.


Look at that cool texture!!!!!!


To define the circles more, I outlined with a black Stabilo All pencil and blended with water.  Made the circles quite bold......


I loved how adding in some white, both by stamping with gesso using a canning lid and a scotch tape dispenser ring, and outlining the circles with a white paint pen blended things again, making the background look more whole.


Finally I added words in sketchy handwriting with a gel pen.


Here's a close-up of the final background with all those wonderful layers!


And here's what I did with the canvas piece, using Roben-Marie's design for the portfolio journal.


This is how it looks inside - a pocket on the left and a signature stitched in made of Bristol paper that I added drippy ink blots to by trying out Dylusions spray inks.


Just had to share my favorite ink blot spread - so cool how the colors combine together.  I think this is going to be a fun journal to play in.

So what did I learn from this?
  1. I read in a Stampington publication once that you can't fake layers......it's true.  I also think that as you work through each one, some of them are quite ugly, but it's just amazing how they all work together in the end.
  2. When you want to make a layered project, it takes time to allow the layers to dry...often more time than you want, but it's an important step to not leave out.  Just think of it as practicing patience :-)
  3. It's important to seal one layer before adding the next either with gel medium or clear gesso, and sometimes, the water in the medium activates the layer and can over-blend it.  Some things like gel pens, don't like to be sealed unless they are REALLY REALLY dry, and a white gel pen just melted away, but not a white paint pen.
  4. You can actually sew through flexible modeling paste with your machine - who knew!


Sunday, May 27, 2012

She Art Girls - fancy dresses

Another She Art girl inspired by Christy Tomlinson. All my previous ones used just paper in their constructions, but I wanted to experiment with strips of ribbon.  I had this one with all kinds of ribbon roses on it.  I sprayed it a peachy pink color, but I'm not sure that came through in the photo.  So on to her story...

Named Fleur by her Francophile mother, she thrived in the long days of summer.  Actually she only left the house when the sky was a cloudless brilliant blue because the rain made her hair look wilted.


Saturday, May 26, 2012

CC2C week 7

I kept it simple with my tag for the CC2C week 7 Challenge using page 49 of the Compendium of Curiosities Vol.II book by Tim Holtz.  This technique is called "Brushless Watercolor" - a cool, dreamy effect!  I used watercolor paper and created a background as well as three little inch-and-a-halfsies and added simple chit-chat sticker embellishments and tiny attacher staples.  This flower stamp made me think about poppies and I don't think mine have started blooming yet....although it's getting a little hard to tell with the weeds starting to grow.  Even though it's a long holiday weekend here, I really do need to get outside and weed my flower beds rather than staying inside and creating my own flowers!


Stamp credits: Stampers Anonymous and Great Impressions
This week's sponsor: Eclectic Paperie

Wednesday, May 23, 2012

She Art Girls - the free spirit

I have another She Art girl for you . 

A free spirit, Violet listened to the prompting of her inner muse.  She wore gems in her hair which she thought only added to her sparkling personality, and her preferred attire was truly a cacophony of colors.  To coordinate with such an outfit she once painted each fingernail with a different color of nail polish and she thought it was quite fantastic.


Here's my background close-up.  I love with this one how you barely see the text tissue paper behind the stamped script text.  I also had fun with embellishing my handwriting and doodling spirals.

Tuesday, May 22, 2012

CC2C #6

This week for Linda's CC2C Challenge we're using page 38 in the book - tissue wrap collage.  My tag follows the technique and is embellished with cut words from my SheArt stamp by Christy Tomlinson (Unity Stamps).
All those wonderful layers and textures just cried out for some definition don't you think?  So I made a couple more tags....so hard to just make ONE tag ;-).....and on these I rubbed over the textures with Portfolio oil pastels.  On the left tag, I used blues, purple and white and rubbed it in more, while on the right tag I just used white.

I love how much more defined those cool wrinkles are!

Monday, May 21, 2012

My weekend with the incomparable Mr. Holtz

This weekend I had the chance to take classes with Tim Holtz and these are the projects from all four classes - what an incredibly fun time!!!

This is the second time I've taken his classes held at Absolutely Everything in Topsfield, MA and there were more than 100 people in each class.  In order to teach them, he has a huge screen and power point presentation showing the steps of his projects and then while giving you time to work on them, he will walk around and chat and answer questions.


Here are pictures of my individual projects:

This is a Steampunk inspired heart in a box on pulley wheels that actually move!  This project was dubbed the baked potato project, because the papier-mâché heart goes through a stage looking like a foil wrapped potato destined for the oven.

This one is a whole bunch of grungeboard techniques all combined on a 12x12 piece that hangs.  While embellishing this one, I had the one and only Mr. Holtz standing behind me commenting on how much he liked all the words I added.  They were not a part of his original design, but he gave us the option at the end, and here I was chatting with him about how design elements can make a piece - how cool is that!!


These two pictures are a project that was a ruler bound embellished tag book.  I liked creating tissue tape hinges on cut pieces of tags to create flip pages.  And how about the die-cut numbers?  A fun look that allowed a peek of the crumpled glassine behind it.

The last project was all about ways to create and alter charms.  We were able to play with his drill punch which will let you punch a hole in anything - case in point, I tried a penny which worked nicely and then just had to add it in ;-)

While I was too shy to ask for my picture to be taken with him - not to mention that I really don't like pictures of myself - I did ask him to autograph my Creative Chemistry apron, and then I won a messenger bag!

So I just had to have him sign it as well and had Mario sign it, too!  If you ever have the opportunity to take a class with him, don't hesitate to do it - a guaranteed fun time!!

Thursday, May 17, 2012

She Art Girls - the shy one

Another She Art girl:  Sweet Miss Millicent, all prim and proper, a true plain Jane.  Her wardrobe matched perfectly her blonde bobbed hair, but inside she was a dreamer although much too shy to show it.  She harbored a secret crush on  local boy, Miles.  She fervently hoped he would ask her out to the movies.

Tuesday, May 15, 2012

She Art Girls - the dreamer

Allow me to introduce you to another of my She Art girls inspired by Christy Tomlinson's class.  

This is Maude - a small town girl with dreams of going to the big city someday.  With a little love and a song in her heart, she knew she could do anything.  Although she first had to work to tame her big unruly bouffant hair-do with a headband whenever the weather was humid :-)


Here's a close-up of this background.  A favorite part is the paint stamping of circles.  The big circle is a canning jar lid, but my favorite is the center of a roll of scotch tape because it gives me a circle within a circle.  You can also see a bit of grid texture - that's stamped with the bottom of a flip-flop!  It's really fun to see what you can find around the house to use as a texture stamp.

Sunday, May 13, 2012

CC2C week #5

Here is my tag made for the Compendium of Curiosities Vol. 2 Challenge using the technique on page 48 - shattered stains. Quite a fun technique, but you have to wait for things to dry - tough when you're impatient and want to play :-).  The technique is on my flowers cut from white chipboard, kind of a black-eyed susan shape - maybe I'm getting ready for next Saturday's Preakness - isn't the winning horse is draped in a blanket of black-eyed susans?  I placed them on a "mop-up tag" - one laying around to pick up left over inks, in this case they are Liquitex Acrylic inks in blues and greens.  I added a bit of embossed texture, drew in stems and leaves, and found words from a package of Idea-ology Chit Chat Stickers and combined them into a sentence that would fit.

Here's a close up to see all the fun crackles:


Thursday, May 10, 2012

She Art Girls - the artist

I will admit to being an online class addict - they are feeding my brain and stretching me creatively in ways I wouldn't have thought.  I have been playing with inspiration from another Christy Tomlinson class - She Art and I have quite a few girls to introduce to you.  I like how her girls don't have faces - it leaves them essentially a blank slate for you to create a personality for them.  So with that in mind, I'll share a tiny story with each of my girls that I'll share with you over the next few weeks.

Christened Florence by her parents, she went by Flo.  Her signature flower tucked in her hair, she firmly believed everything was better with flowers.  She maintained an ever-lengthening list of hobbies always wanting to try something new.  Never liking to be stifled and fenced in, she needed room to grow.

This close up shows some of the background built up by layers of tissue paper, acrylic paint, gesso, paint stamping, ink stamping, and doodling with black and white pens.  So much messy fun :-)

Sunday, May 6, 2012

Art Journal Play

Here's an art journal page with inspiration from a class on Christy Tomlinson's blog called the Art of Wild Abandonment taught by Junelle Jacobson.  The background was such messy fun to make!  Lots of layers - tissue paper, acrylic paint, gesso, paint stamping, ink stamping, mod podge, and a sewn border.  The flowers are cut from deli paper sprayed with Dylusions ink sprays - really incredible vibrant colors.  I added pen doodling, buttons, and gems.  The bit of found text seemed appropriate :-)


Here's a close-up of one of the flowers.  I love the splotchy spray look on the deli paper.  And see...I even sewed my buttons!

It just so happens that on My Mojo Monthly Sarah has chosen the theme of floral frenzy - an appropriate choice for May, don't you think since April showers bring May flowers!  So I'm adding in my funky flowers for the frenzy :-)  Take some time to look at Sarah's recent posts as it looks like she's been bit by the art journaling bug too and is having great fun playing.  Such wonderful inspiration to see!

Stamp credits:  KaiserCraft and Paperbag Studios

Saturday, May 5, 2012

CC2C tag for week 4

A really fun technique this week for Linda's CC2 Challenge - "faded layers" with directions on page 43 of Tim's book.  I loved the way my tag background turned out and embellished it with some crumpled book text flowers cut from the tattered florals die.  I added a quote from the artist Matisse - I've been enjoying playing around with my own handwriting, but have to admit that it's pretty hard to embellish it when it has to be small enough to fit in the whole quote lol!

Stamp credits: text: Christy Tomlinson for Unity Stamps, zig-zag - my own hand-carved stamp :-)

Tuesday, May 1, 2012

Sneak Peek

Here's something to let you know about - I have an article published in this month's issue of Scrap365!!!!!!!!

I can't show the project, but I can show you a sneak peek of page 22.....


I know you can't tell much because it's only a tiny peek, but I can tell you it uses colourful Glimmer Mists, it's guaranteed to give you inky fingers if you make one, and honestly it's just plain cool!!!!!!!!!!!!!!!!!!!!!!

Curious aren't you?  You'll have to check out the magazine to see my article complete with a step-by-step tutorial.  Here in the US you can find the May issue at Barnes and Noble.  I hope you like it :-)